11111111111111111111111111111111111

Search this website

Small Business and Great Customer Service {Part 1}

Hi Friends,

This series of Small business and Customer Service will be broken into two parts...here's part 1.

I recently mentioned on Facebook how I'd like to share my lessons on customer service...so today's post
 is brought to you by the 
letters S and B

For Social Butterfly
And Small Business

While customer service has changed dramatically with the use of the internet, there are still some cases where you get the pleasure of networking in person.  I approach each new person I meet, whether in a working environment (Craft Show) or casual, as a future relationship which could lead to referring my business 
or being a regular customer.  As well, I just love meeting new people hence, social butterfly.


Here's the Facebook post I mention in the video sharing how I made someones day, and they in return, made mine.

I posted this question on my Facebook page, and she replied with an answer and two compliments. 


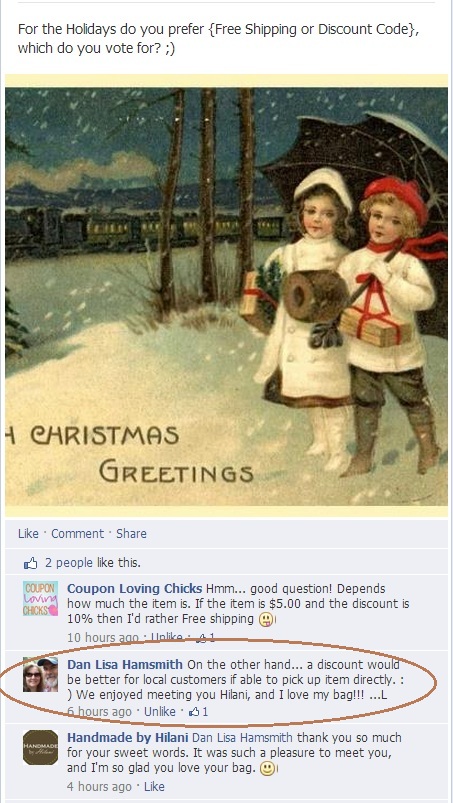
Because of extra time, listening, and talking, I've possibly expanded my customer base.  So via the traditional way, I've built a relationship with a buying customer who then could happily share me/Handmade by Hilani, with her friends and co-workers.  

Thanks for reading along...until next time.

In Part 2, I'll be talking about an Author that you need to know well, another sweet customer story and final thoughts on customer service & your small business.

For Part 2, click here


Did you enjoy this post? Consider becoming apart of our community by subscribing 
HERE to future posts.  


Pin It

Best Rolled Sugar Cookie Recipe

Hi Everyone!

Around this time of year, I round up my baking supplies and grab my boys to make memories in the kitchen. One of our favorites to bake are cut-out Sugar Cookies.  I searched the internet years ago and tested so many but 
finally came to the very best, and now a staple 
recipe this time of year.

The dough makes so much, it lasts all month long.  I bake only a little at a time, and freeze the unused dough, which is great for on the fly baking.

The key is to make sure you keep the dough thick when cutting, and roll out fresh from the freezer!

They are a sure fire hit when shared.


Below is the Recipe with tips on how to achieve non, thin, crisp cookies, unless that's your style.  

Original Source: Rolled Sugar Cookies


Ingredients:
1 1/2 cup of butter, softened
2 cups of white sugar
4 eggs, room temperature
2-3 teaspoon of vanilla
5 cups of all purpose white flour
2 teaspoons of baking powder
1 teaspoon of salt

Now, the recipe only called for 1 teaspoon of vanilla and I'm a terrible listener when it comes to vanilla, I have a very heavy pour; trust me, more is better. 


Prep Time: 20 Minutes
Chill Time:  1-12 hours
Cook Time: 5-8 Minutes

Directions:
Preheat oven to 400 degrees or 375 for convection
Here, at high altitude, convection is my preferred baking method

1.  In a large bowl, cream together softened butter and sugar until smooth.  Beat in eggs and vanilla. 

2.  In separate bowl mix dry ingredients.

3.  Add dry to wet ingredients. 
I used a Kitchen-Aid electric mixer.  Be advised when slowly adding your 5 cups of flour, it becomes tough for the machine to function so a little at a time. 

4.  Once fully mixed, prepare saran wrap in an x shape on your counter.  Scoop out and place wet dough down 
and form into a loaf.  Cover dough with saran wrap and chill in the freezer for 1 hour or overnight.


5.  Once chilled, remove from freezer and cut with a large knife the amount you wish to use.  I like to work with a little bit at a time.


6.  I've learned, for best results, use the dough totally frozen.  When working with your warm hands, it tends to soften.  Then roll out to 1/4 or 1/2 inch thickness.


7.  Once cut, bake for small amounts of time to desired consistency color of cookie. I start with 5 minutes.  You do not want brown edges so at about 6 minutes pull them out of the oven, and let sit on cookie sheet for 3 more minutes to prolong baking.  Once done, be careful, they break easily but that's the beauty of them.

So there you go...I surely hope you enjoy them as much as our family does. They are a hit all over the neighborhood.  


Happy Holidays!


Enter your email address:


Delivered by FeedBurner


This post was linked up at:
Pinworthy Projects Just us Four


Pin It

Twilight Saga Giveaway


Back by Popular Demand, and in honor of the recent release of Breaking Dawn Part 2 
(I think my favorite behind the Original Twilight, 
but then I loved Eclipse...oh, I can't decide)
I'm happy to share another Twilight Giveaway for all the
 Twi-Hards out there.

Up for grabs, via the Rafflecopter below, is a one-of-a-kind Twi-Hard re-usable drink sleeve, with silver embroidery of an Edward Cullen font, on Black fabric .


Good Luck and may the best Twi-Hard win.  Make sure to come back and enter each day in the categories that allow for extra points.

This Giveaway is open to the US and Canada only. 


Did you enjoy this post? Consider becoming apart of our community by subscribing 
HERE to future posts.  


Pin It

Thanksgiving {Indoor} Scavenger Hunt Printable

I hosted a play date for an entire day and before doing so, I decided to be creative with how we'd pass the time.  Among Play-Doh, coloring Fall specific pictures, and painting of mini pumpkins I incorporated this fun Indoor scavenger hunt printable.  I asked those participating to search the main level of our home for the pictured items.  As you can image, their eyes lite up and pencils came flying out.  They had so much fun counting and scouting, they asked for another one, when all was said and done.


 Thanksgiving Hunt Printable


{Hunt Specifics}

Great for ages 3 - 9 years old

Great for siblings

Great math lesson
(For grades 1-3, encourage tally marks)

Fun time filler for play dates

Great for Family Gatherings.

Enjoy!


Pin It

Upcoming Events {Black Friday Deal}

Hey everyone,

Here's a preview of what's to come....


 Happy Shopping! 


Did you enjoy this post? Consider becoming apart of our community by subscribing 
HERE to future posts.  


Pin It

Stamped Washer Ornament via {SweetPea}

Hi friends,

I had the wonderful pleasure of meeting today's guest from the bloggy world, and I'm excited to introduce you to her.   She's inspiring, sweet, and creative.  She's here today to guest post a really great project I know you'll enjoy!   
Take it away Paula.....

Hello, Handmade by Hilani readers, I’m Paula from Sweet Pea. I’m delight to be here today to share an easy Christmas ornament craft that’s sure to please anyone on your shopping list.

Stamped Washer Christmas Ornament by Virginia Sweet Pea


Supplies Needed:

Washers
Stamp Kit (I got mine at Harbour Freight.)
Hammer
Black Sharpie
Baby Wipes
E-6000 Glue
Ribbon or Twine
Washer Ornament Supplies


How To:

Start by stamping the washers on a concrete surface.  Be sure to buy a few extra washer because you are bound to have a few failed attempts.
Washer with 2012 Stamp
One washer at a time, go over the stamping with a black Sharpie.
Washer with 2012 and Sharpie

Immediately wipe clean with a baby wipe. The marker will make your stamped letters pop.
Washer with 2012 after Wiping with Baby Wipe

Glue washers together.
Washer Glued

After the glue dries, tie on ribbon.
Washer Ornament with Ribbon


Stamped washer ornaments are quick and easy to make and also inexpensive.

Stamped Washer Christmas  Ornament


I’m a 7th grade teacher and made a washer ornament for each child in my homeroom to hang on their tree at home.  Both the boys and girls can’t wait to take these home.


Boys with Ornaments

Many thanks to Hilani for having me over to visit today.  I’d love it if you’d join me at Sweet Pea where I enjoy blogging about crafting, cooking, gardening, decorating, travel, and exercise.


Did you enjoy this post? Consider becoming apart of our community by subscribing 
HERE to future posts.  


Pin It

ShareThis