11111111111111111111111111111111111

Search this website

It's beginning to look a lot like Christmas....

With Thanksgiving behind us, my inner child is surfacing very quickly as I spread Holiday Cheer throughout our home...


Below are pictures I've taken to capture the spirit of Christmas in our home.  I hope a few of them inspire you, when you decorate your personal space this holiday season.


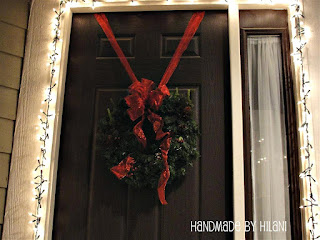
Our home builder thought it would be creative to make the front door larger than the standard size. This made it hard to find an over-the-door wreath hook that was long enough to display my wreath in just the right spot.  I decided to take matter in my own hands and use ribbon (one of my many addictions) to hang it as low as I'd like. 


As people come and go throughout our home this time of year, I thought it would be neat to display our received Christmas cards on the back of our front door. 


When you enter our home, this wreath hangs above a black, distressed bench. A bench where jackets and shoes are gathered.  I liked the idea, because of it's location, to incorporate a hint of the outdoors with this lantern and then fill it with small, red Christmas ball ornaments.


Our advent calendar are stockings which trail up the staircase starting with number 1 at the bottom.  Each night a little something is left for the boys to enjoy.


I'm a sucker for anything that makes my boys go "Oh, Ah..." so when I noticed a great place in my dining room to creatively display a Snow Village, I jumped on eBay and started shopping. This is a Department 56 "The Original Show Village" collection.


I have a thing for vintage books and snowman.  I like to put them just about anywhere possible.  These pieces are displayed on our living room cabinet. 


Love is....spoken here


Also in our living room, is our Fake Christmas Tree. Sadly, iColorado, due to it's dry climate, a real tree put up this early would probably not survive. The tree has red, satin bows, small, gold balls, rustic snowman, and many picture frame ornaments. I underestimated the amount of reminiscing that would come when setting up the tree...sigh...

(This is my littlest peanut enjoying the tree)

One of my favorite pieces, a Snowman Cookie Jar I got from Pottery Barn 6 years ago reduced from $65.00 down to $15...score! :)


Lastly, a sign I enjoy seeing everyday...


Merry Christmas from our house to yours!


Pin It

Peppermint Bark - {So Easy}

I decided to try something new this year for my 'offering' at holiday happy hours.  I searched Peppermint Bark into Google and of course, Paula Dean's recipe generated first in the results.  I can't believe I haven't made these before because it was very easy!

Below is her recipe with variations 


Total time from start to finish: 40 Minutes - 10 prep, 30 minutes freeze

Ingredients:
1 cup of Crushed Peppermint Candies - I used Candy Canes (7)
Peppermint Extract - 1tsp
6 cups of semi-sweet chocolate chips (a staple I always have on hand)
1 small to medium Cookie Sheet
Parchment Paper, enough to cover your cookie sheet

Preparation:
Melt either in Microwave or Double Broiler style your Chocolate
Add Peppermint Extract - Stir until well mixed
I added 1/2 of the Crusted Candy Canes at this point - Stir again
Line Your cookie sheet with the paper
Pour out your chocolate mixture onto the paper
Try to spread evenly
Once spreading is done, sprinkle remaining candy on top
Place in Freezer for 30 minutes.

Assemble:
Chose a serving dish
Remove Bark from Freezer
Break into irregular pieces

Enjoy, and happy holiday-ing!


Pin It

{Jingle Bells} - Door Accent Tutorial


I just love the sound of Bells during Christmas.  I have them on frequently used doors throughout our home.  
I've been holding onto a great find from the $1 ribbon bin at Michael's, until I have just the right project for it.  This "Merry Christmas" ribbon,
 which was right up my alley due to it's price and vintage appearance was a great find.  

I was browsing the isles, at our local Hobby Lobby, when an idea called out at me.  A canister of vintage/rustic bells called my name from a 50% off shelf.    I decided, that moment, I was going to create a Door Bell accent with them and the ribbon.  I excitedly dropped them into my cart, and while hearing their distinct Christmas jingle, my creative wheels started spinning..."What exactly should this craft look like when I'm done?"
I remembered, while driving home, that a week prior I threw in my cart a bag of wooden Stars from the clearance section at Michael's.  That too was a great find because the 
set of 4 stars were only $0.47. 


Below is a tutorial on making this Jingle Bell Door Accent.  


Project Time:
45 minutes - 1 hour (Ideal for naptime)


Supplies Needed

Purchased Items:
Ribbon $1.00
Bells $4.99 (mine were 50% off)
Wooden Star ($0.47 clearance)
Scrap Fabric - Two contrasting colors or One (FREE)

On Hand Supplies:
Craft Glue
Close Pin
Pencil
Rag (for sticky fingers)
Damp Paper towel

Step 1:
Trace on wrong side of fabric for Front fabric choice, if using two different prints.


Step 2:
Free Hand an additional trace line about 1/2 an inch larger, for cutting, around the actual star size.


Step 3:
If using a second fabric, trace on right side of fabric the star.
Otherwise, trace a second star on your first fabric making two star cut-outs. One larger and one exact.


Step 4:
Get Glue and Star ready for gluing.
Place wooden star on wrong side of Fabric and cut slits into into corners of fabric for easy folding over.


Step 5:
Apply Glue to wood and begin folding over fabric.


Step 6:
When corners fold over, cut off excess fabric.  To adhere the corners from lifting, 
smooth over extra glue with  your finger.


Step 7:
When finished this is how the right side should look.  Turn over with wooden Star exposed upwards, and apply your second fabric star on top.


Step 8:
Grab your bells and ribbon. Cut Ribbon 30" long, or more, you can always shorten your tails. Be safe, cut longer. :0)


Step 9:
Find the middle point of your ribbon. Apply glue to the center of the star on the fabric.
Wrap your ribbon around the star. Place glue at the top of the star, between the two ribbons, to merry them.  Hold them together with a cloths pin. 


Step 10:
Count out 11 - 12 bells and begin to thread them on the ribbon.
Thread 1 bell on each strand and the third bell onto both strands.  Continue to thread until you've used all bells.


Step 11:
Find a door to hang them from for ultimate drying of glue (while cloths pin still attached).


I hope you enjoyed this tutorial and it inspires you to make one to fill your home with sounds of Christmas!


Pin It

Is working on a Fun Christmas Tutorial...

for a Christmas themed {Jingle Bells Door Knob} Display.  

It will have Vintage/Rustic bells, a Wooden Star, Fabric and a classic Christmas Ribbon.

It's an Under $10 dollar DIY.


Pin It

Thoughtful Thursday

Today's Thought:


Pin It

Organize Much?

I'm a big fan of organization, I think it keeps the mind clear for more creative uses.  I clipped a $1.00 off coupon for the 3M Command stick'em hooks and decided to give it a try. 
I was immediately hooked!

Below are images of how I use my hooks.  I'm constantly thinking of ways to add more around the house.


A hall closet has two on the inside of the door. 
Holding a bag full of diaper items (here on the main level) and 
my sons Home Depot apron (1st Saturday of every month, crafts for FREE).  
He can now get his apron on his own, one less thing for me to do.


Three hooks in our front closet hold my purse, my sons backpack and a wall hook for a diaper bag.

In the kitchen, sink cabinet, one for my dish towel.

If you see the coupons, clip them and give them a try!


Pin It

It's kind of like a wedding...a Craft Fair that is

So many weeks went into the preparation,
but we'll flashback to 2 weeks away...

It's another late night after the family has gone to bed, that 
I decided it's time to lay out all of my finished items and review what I've sewn so far.


 While I begin to lay everything out on the hardwood floors of my sewing studio I ask myself,  "Let's see, do I have enough merchandise and are the fabrics I've picked going to appeal to the many customers I plan to meet?"  It occurred to me, very quickly, that I was about to have a long conversation with myself before I came to ask the final question,
 "Is it safe to say, I'm good-to-go?"

There were a series of questions ringing, several times over, in my head I finally shut off the voices, found the confidence, and believed I indeed had the right amount of items, 
and all looked great.

1 week away...

While rolling my eyes at myself, "Man, how many lists am I gonna make to cross check, and double check, so that I don't forgot anything?" I came to discover, at least 6.
In the process of making myself crazy, I discovered I was also making my (wonderful) husband crazy.  Which I'll add, he too asked many questions, good ones I'll give him that, but the over thinking was surely in overdrive.

Craft Fair Day...1:30 am

In a stricken panic, when I opened my eyes, "OMGosh, what time is it?" I thought . Which then followed with, "Seriously, 1:30a?! Super, now I'm doomed to battle it out with any thoughts that surface which will surely be mental check lists because now I'm up..." :)

Let's just say a quick review occured but I quickly went back to sleep because I knew a long, exciting day was ahead... kind of like a wedding, I came to learn.
So much preparation occurs prior to attending, and selling, at a craft fair, much like so much work goes into a wedding.  Both sharing a common thread, they are (usually) one day.


7:00am - Roll out of the Drive Way and head to the Craft Fair
7:20am - Begin unloading and setting up
9:00am - Craft Fair of almost 100 vendors opens its doors
9:30am - The crowds begin to fill the isles as wonderful 
Christmas music fills the air (My favorite)
10:00am - My Helper arrives, my mother-in-law, just in time because the booth is filling with customers talking excitedly about the uniqueness of the products I created.
11:00am - Where did the last hour go?
12:00pm - Just realized I'm starving but sitting down isn't an option there's tons of people and custom ordering is my favorite part about what I do.
1:00pm - 3:00pm - So many people coming and going today's turning out to be a huge success for this small business operated by a Stay-at-Home Mom.
4pm - My goodness, what a day.  I was in flats but it surely felt like I was in heels, my feet were begging for a break.  Unlike a wedding, where the bride dances the night away barefoot, I didn't have that option.   The whole day was non-stop; I feel so blessed. The hubby shows up for tear-down and the days finished.  So many weeks of preparation that I can't believe it's over...a day well worth all the time invested...
much like a wedding. 


A picture of me and the hubby in his Dad's Classic Convertible 11 years ago on our wedding day.

I look forward to my next craft fair, whenever that may be, and sharing the products I sew for all to enjoy.


Pin It

ShareThis