11111111111111111111111111111111111

Search this website

Showing posts with label DIY. Show all posts

Style U by Casey {Giveaway} - Fitness Headband

Hey everyone...something fun for you to Win!

Many of my friends (both online and in person) will tell you, I'm a big cheerleader for whatever they do.  I love to support people in their adventures whether training for a race, starting their own business, or picking up a hobby.   This friend I’m about to share with you has recently started her own business, and it's soared fast with repeat business and referrals. 

She assists those needing a little extra style by helping them re-shop their closet and pairing new pieces with clothes you wouldn’t normally…stepping outside of your day to day comfort zone.  She doesn’t wish to change your style, she just helps you enhance it with accessories or a little pop of color.  She's become my personal stylist and I make her proud. He, He...

While working with her one day I told her she needed some sort of accessory to offer the customers when helping them {closet shop}…I thought of Scarves.  She had a sewing machine but didn’t know how to use it…she was in luck, I tell you, because I was about to take her on as my new student.

Below are a few images of her “work” and the items I wish to Giveaway to 1 lucky winner.


Here are the two {Fitness Headbands} she's created to share with one lucky winner.  Enter via the Rafflecopter app below....GOOD LUCK!

These headbands are lined with Velvet to create a nonslip grip.  They fit both little girls and big girls.

I own three (I'm wearing one right now) and if you've learned one thing about me, I LOVE the color GREEN so when she gave me this green with chocolate polka dots, I frowned like a little girl and said, "Wait, I want this one."  She assured me I can have my very own, in this style. :)  Happy Dance. 


{The Courtney Headband}


{ The Michelle Headband}


Thanks for stopping by and again, good luck!


Pin It

Creative Carmella - Wall Clock Project

Good Morning Everyone!

I'm so excited to share with everyone someone I adore a bunch and whom I've had the absolutely pleasure of meeting because of blogging!!  She and I found each other over on Facebook and quickly became online friends.  We are two peas I tell you and if you start following her, you'll like her just as much!  


You're in for a real treat with today's post...take it away!


I am so happy to be here on my Bestie's blog!!
I just love everything about this sweet friend of mine.....she's totally part of my wolf pack ;)


I'm Carmella, mom to three...wife to one...and the voice behind the blog, Creative Carmella. There, I share stories from our world, recipes, DIY projects and a ton of creative inspiration!

Today, I am excited to share my table top clock project!


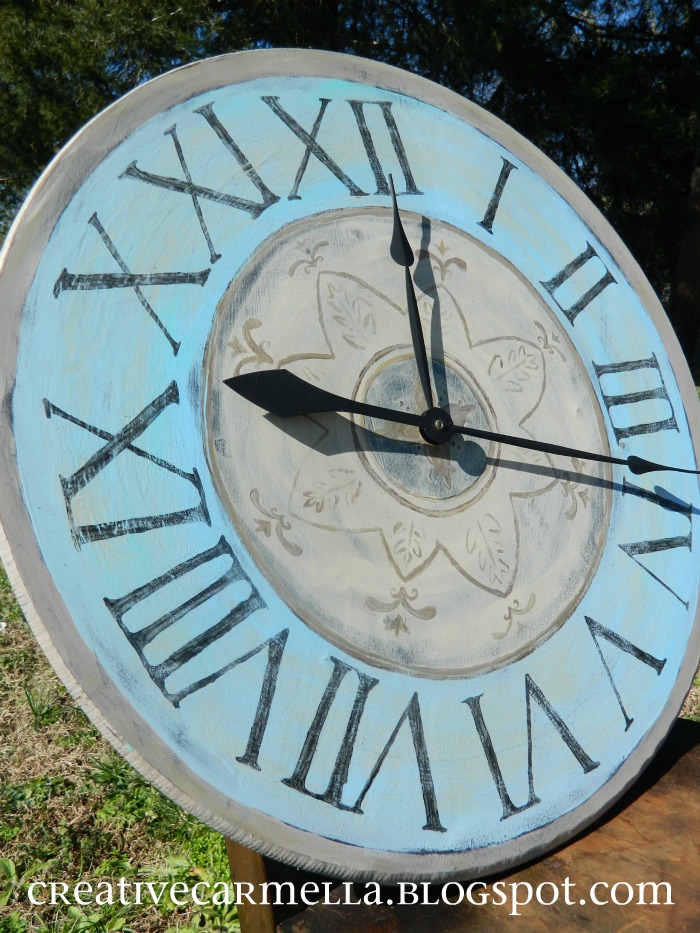
This is the story of a clock...that once was a table top.....


This clock started with the inspiration board that Meg 
from Winder and Main pulled together for me.
Waaaaay back I shared  pictures of my living room because Meg was helping me restyle it.
Well...she hit the nail on the head with this inspiration board...
She calls it "farm house in the city"
and I love everything about it


Great look, right? She did such a great job!
Did you notice that awesome clock in the right hand corner??
Here is a closer look


This one is from Target...the cost...$89!
Total cost for my knock off clock was $12!!

Here's what I did...

I started with a table top that we had stored in an upstairs closet. You know these....the pressed wood kind that have three legs that screw in? I'm sure you have one in the back of a closet too somewhere.....


I took all the hardware off of the back, and my helper boy got to work giving it a coat of black paint


Next we found the center, hammered in a nail, and used a white colored pencil with a string tied to it and the nail to circle off the different areas of the clock


After that, it was all about the details....


And.....more details.....


I added the Roman Numerals using a transfer trick that always seems to work the best for me and then painted them all in by hand...

{warning, terrible night time pic!!}

And after it was all painted in, the entire piece got a sanding...

The clock findings came from Hobby Lobby and with my 40% off coupon I was able to finish the clock for a total of $12!


Oh...giant clock...how I love you....


Hilani, thank you so much for having me today!!

And a huge thanks to you all for reading too!
I would love for you to come visit soon!
Here's my Facebook Page

Isn't that the coolest idea and finished product!?

Thanks again Carmella, my sweet friend!


Pin It

Decorating for Fall

Hi all...

Well, it's in the air here, Fall that is.  You can smell the cooler air and some are reporting a few trees in the Rockies have leaves slightly changing.

I'm writing this post today because I had a funny morning and wanted all of you to hear about it.

We are blessed to have our school within walking distance and that gives the kids and us moms time to catch up each morning (it's a real treat, I don't take for granted).  While collecting one of my sweets this morning, Gretchen, I was super excited to see her decorating for Fall!  Yes ladies (and Gents) she was decorating for Fall.  

Here's a glimpse into how our conversation went...which would be how I talk my sweet girlfriends!

Me: "What are you doing, is that an Autumn sign I see up?"

Gretchen:  "I'm so ready, so I'm decorating for Fall!"

Me: "Ya! (clapping enthusiastically), you've just given me the Green Light to decorate!"

Gretchen:  "Well, I'm also cleaning." As she passed by her Vacuum to collect her shoes because we need to get going.  

Me:  "Oh, let's not get crazy now...!" Waving one hand to dismiss that non-sense.

Me & Gretchen:  Both of us laughed out loud.

She's my silly friend, that laughs hard with me, has the same sense of humor, and we get each other.


This picture was taken by her, at an outside showing of "Twilight" we attended, 
with several other great girlfriends. 


So...as we exit Summer


and start thinking about Fall


Consider following my Autumn pinboard for inspiration.

consider this your Green Light to decorate your home for what "I" think is the most beloved season of all.


Coming Soon:
Look out for my next project...a burlap something; I'll leave it a surprise. Consider Subscribing, so Handmade by Hilani posts go right to your inbox, and you don't miss a thing.
(posts publish about once a week)


This Post was linked up @:


Pin It

{Mason Jar} - Re-purpose Project

Hi Everyone,

Oh, have I got a treat for you...

I'm a lover of Peaches, especially when a top cottage cheese, rice or chicken. The flavor is so tantalizing.  I even enjoy it in salsa vs. its competitor, mango.  We frequent Costco, which is where we buy sliced peaches, jarred.  They come in a 4 pack and don't last long in the house...but the mason jars, those do! 

Here's a  BEFORE and AFTER of how I like to re-purpose my mason jars.


The After picture is  {My} Mommy Tip Jar.  Spare change goes in it and when my husband ate lunch out more frequently, this baby filled up fast; from emptying pockets, at Laundry time.

Re-purposed with a Fabric Cap cover, raffia and chalk paint, 
it has taken on a whole new image.  
(You can find my tutorial for Fabric Cap Covers here )

That Tutorial features this same jar being used to hold my healthy collection of buttons, now color-categorized.

Picture Here:

And finally, I actually use these Jars, minus their Lids, during the warm summer months as Drinking glasses. Below you'll find a picture I posted on Instagram - I'm enjoying here a Seagram's Sweet Tea Vodka and Lemonade, on my back patio.


If you'd like more Mason Jar inspiration, considering following my Pinboard of Mason Jar ideas

Thanks for reading along, I hope this inspires you to re-purpose ...   and, why not a fun Peach Recipe

Source:  Not without Salt

This looks so darn good!!!


This Post was Linked Up @:


Pin It

{Front Porch} Message Board

I purchased, about 15 years ago, a fun Martha Stewart home crafts book at a garage sale and one of the items I so wished to re-create  was a porch chalkboard. 

She had hers on the porch of a summer cottage; a-mazing.  While my house isn't a summer cottage, it is a home that has visitors often, of which I miss.  A message board would be nice, every now and then. And it looks super cute!


The craft called for a Large Black Slate piece, which I never came to find. Which then lead me to recreating it myself, in my style.  I found, at the Goodwill, this Frame and voila the vision was born.


Before / After


I gave the frame a white wash look after a little sanding

Then, I found this great Tutorial for Rosette Flowers online (pinned it, of course) and decided to add them to the frame.


I then decided to have a piece of chalk readily available so, I got my trusty hot glue gun out and, with twine, attached it to the chalk.


Since having completed this project, a few weeks ago, I've added a Burlap Letter to the porch, some flowers, and a watering can.  It's surely my style now!


But here's the funny part.  I've had two random secret messages posted:


After a few days, I discovered who the 
sweet messengers were, my girlfriends, they're so silly! :)

So there you have it.  Now get paint on your hands, and make your space, your own.


This was linked up @:


Pin It

ShareThis